If you’re hungry for adventure and LOVE a good hike, then you must make climbing Mount Kinabalu an essential part of your Malaysia trip.
Located in Mount Kinabalu National Park (the first UNESCO Heritage Site of Malaysia), Mount Kinabalu stands as the highest mountain in Malaysia. At a whopping 4,095 meters above sea level, hiking this beautiful giant is one of the best things to do in Sabah, the Malaysian state in Borneo.
This hike is not to be underestimated and can be challenging in some places, but is it worth it? Heck yes!
The views from the Mount Kinabalu summit as the sunrises from the east are ones that will stay with you for a lifetime. The hike itself trails through dense jungle, past comforting streams, and over daring boulders.
If you’re someone who likes a challenge, you’ll love this hike.
So, let’s get straight to it!
Mount Kinabalu Climb Difficulty

Before you book put on your hiking boots and book your flight to Sabah, we have to warn you.
The Mount Kinabalu hike is hard, very hard in some places.
The Mount Kinabalu climb difficulty is attributed to several factors.
First, the height of Mount Kinabalu is a staggering 4,095 meters (14,345 ft) above sea level, an elevation that results in less oxygen in the atmosphere. Climbers can easily get altitude sickness at this altitude.
Second, the terrain of Mount Kinabalu is diverse. You climb through many different environments such as forests and jungles just to reach exposed granite at the summit, where the surface is so slippery you must use your arms and legs to pull yourself up.
Not everyone that attempts the Mount Kinabalu hike succeeds. In fact, we saw many people that were unable to summit the day we hiked. A person with decent physical conditions and lots of perseverance is the bare minimum.
Lastly, the Mount Kinabalu hike is a 2-day 1-night trekking experience. On the first day of the hike, you are trekking 5 to 7 hours up. And on the second day, you must wake up at 2 AM in the morning to hike to the peak for sunrise, come back down to basecamp for breakfast, then hike all the way back down. It is a day of around 8 to 9 hours of physical activity.
Choosing The Right Mount Kinabalu Tour Operator

If you want to hike Mt. Kinabalu, unfortunately you cannot go independently, and you must use a tour operator.
Due to safety concerns after the tragic 2015 Sabah earthquake, hikers are no longer allowed to enter the mountain without a guide. Usually, that isn’t a great thing, but this actually made us feel much safer as there were some parts of the hike toward the summit that were a bit treacherous, especially at night (more on that later).
You can also no longer do a day hike, as no more day-hike permits are given at the Kinabalu Park HQ. The only option to reach the Mount Kinabalu summit is through a 2 days 1 night tour.
If you want to take your time, you can opt for a 3-day hiking package that takes you through some of the mountainside villages along the way. However, from my experience, 2 days is enough to see the beauty of Mount Kinabalu and feel the burn from the hike.
Keep in mind that Kinabalu Park allots 165 climbing permits per day, so make sure you reserve your tour package in advance.
For that reason, the packages listed below are for the Mount Kinabalu 2D1N package.
Mount Kinabalu – The Most Reputable Company For Mount Kinabalu Hike

If you want the most reputable company, then it would be a no-brainer to book your tour directly with the Mount Kinabalu tour company.
The park employs some of the most experienced mountain guides who have a real knowledge of the mountain. Many of their guides have grown up in the Mount Kinabalu region, so you are guaranteed to be in safe hands.
For a 2D1N Kinabalu tour package, the more people in your group the cheaper the cost, but prices usually start from a pricey 2,230 Malaysian Ringgit per person (at the time of writing). But keep an eye on their website, as promotions are often added, and they also keep you up to date on park closures.
This is the Mt. Kinabalu company we decided to go with. Though it was pricey, it was worth the extra money spent.
Prices are also different for foreigners and Malaysians, so check their website to see how much it will actually cost.
DownBelow Adventures – One Of The Cheapest Climbing Mount Kinabalu Packages
Prices for hiking Mount Kinabalu vary so dramatically, so it is worth shopping around before booking.
The cheapest price we have seen so far is that of DownBelow Adventures which are offering a 2D1N Mount Kinabalu package for around 1250 Malaysian Ringgit for foreign tourists. (Cost is different for foreigners vs. Malay nationals)
Although, this price is only available if you book online from their website. This package includes everything from your transfer to the mountain from Kota Kinabalu, accommodation, guide, hiking permit (incl. insurance) and your meals.
Personally, we would say that’s a pretty darn good deal.
Viator – The Most Convenient Tour Company For The Mount Kinabalu Climb
Viator is one of the most reliable and affordable travel tour companies in the world. The Mount Kinabalu tour is no exception. With Viator, you are in the hands of professional experts who will offer you compensation and great support if needed.
Hidden Costs Of The Mount Kinabalu Trek

When booking your Mt. Kinabalu tour package, look carefully into the things that are included. Many companies will try to make their package more attractive by not including some fees, such as transport, lunch, park admission fees, and more.
Don’t just look at the price.
If some of the fees are not already included in your package, you might have to pay that in cash when you arrive at the park. This could seriously add to your climbing Mount Kinabalu budget.
Most tour companies will not include a porter (someone to carry your bag up and down the mountain for you), but these are available to hire from the start of the hike for a reasonable price.
You’ll have to do some negotiating with the porters, but the going rate is around 130-200 Malaysian Ringgit per 10kg bag (at the time of writing).
You also have the option of leaving your bag in a secure locker at the Kinabalu Park HQ Reception, if you do not want to carry your entire suitcase up the mountain. This costs around 12 Malaysian Ringgit per bag.
Some packages include a certificate, but some do not. If you want to get a souvenir certificate to show you completed the hike, they cost around 10 Malaysian Ringgit.
Best Time To Climb Mount Kinabalu, Malaysia

The best time to climb Mount Kinabalu is from March to September during the dry season. The Northeast monsoon season in Sabah runs from October to March, so the terrain can be a little more treacherous.
The park rangers keep an eye on daily weather warnings. If they sense that the wind or rain is too strong, climbers are not allowed to summit. Because of this, the moonson season (October to March) is the low season for trekking Mount Kinabalu.
It isn’t necessarily a bad thing, because with the low season comes a bunch of ridiculously low prices on tours! If you are traveling Sabah on a budget, the best time to hike Mount Kinabalu might be during the monsoon season.
May to September can be very hot and humid, which doesn’t make comfortable hiking weather, though not impossible.
Another thing to consider is that Mount Kinabalu is located in an earthquake zone, which means that sometimes the park closes for safety concerns.
It is a good idea to keep an eye on the park website for details of park closures before your trip and invest in some good travel insurance in case of any unforeseen closures.
But don’t let this put you off, the park rangers are highly experienced and work round the clock to keep hikers safe. They would not open the park if they thought there is any danger.
Our Experience Hiking Mount Kinabalu, The Highest Mountain In Malaysia
Day 1: From Timpohon Gate (1,866 m) to Panalaban Base Camp (3,270 m)

Because the tour package we selected included a stay in the Sutera Sanctuary Lodge inside Kinabalu Park the night before, we didn’t need to get to the park early in the morning.
Some travelers stay in Kota Kinabalu and take the 1.5-hour public transportation to Kinabalu Park in the morning. While that is also an option, it eats into valuable hiking time.
If you are coming from Kota Kinabalu, simply take the shared minivans at Padang Merdeka bound for Ranau. Tell the driver that you want to get off at the Kinabalu National Park.
If your tour package does not include a stay inside the park before your hike, you can elect to make your own reservation. We personally recommend Sutera Sanctuary Lodges because they were so welcoming and knowledgeable.

After a delicious buffet at Balsam Buffet Restaurant (included in our package), we met the tour guide and got on the transport to Timpohon Gate (also included), which is the start of the hike. It was only a 10-minute journey, but necessary to get to the start of the Mount Kinabalu hiking trail.
After a little briefing from our tour guide, we started the hike promptly at 10 AM. Every minute counts because we needed to reach the Panalaban Base Camp, which is a 1400m ascent and a 6-kilometer hike. Though not much in distance, the hike actually takes around 4-6 hours due to the altitude.
Surprisingly, the first part of the hike is a descent into the forest (a little unnerving, as you want to be going uphill). This section isn’t long, but it’s slippery, especially after it has rained.

Take your time and go slow as you do not want to fall down in the mud before you’ve even started.
After about 30 minutes of going downhill, you need to cross the river and hike up the bank on the other side. Because of the tropical jungle environment, this section of the Mount Kinabalu trail was surprisingly one of the hardest parts of the hike.
The bank was really muddy and made worse by the sheer number of hikers that had been there before us. It was also congested, which meant we had to keep stopping…not a huge problem, except stopping in slippery mud felt a little uneasy.
After about another 30 minutes of hiking through mud, we reached the start of the trail up the mountain.
From here, it gets easier, though still not to be underestimated. The terrain changes from mud to rock which feels a lot sturdier under the feet, though can be slippery in places.
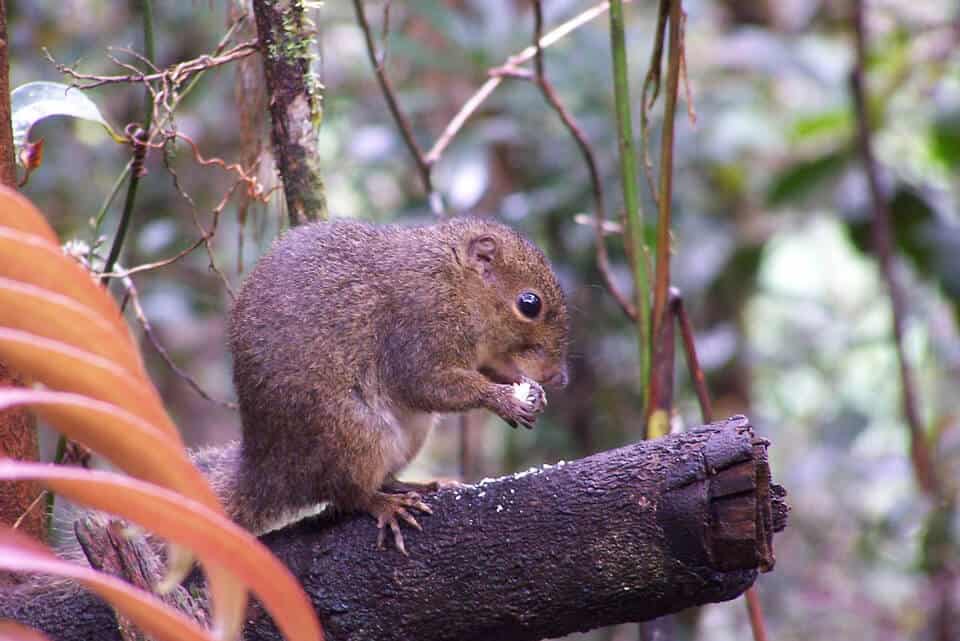
The trail leads through a dense cloud forest teeming with wildlife. Be sure to take it all in as you go up the trail; some hikers have claimed to see tree shrews and flying squirrels.
As we ascended the hike there were huts every kilometer where we could sit and catch our breath. At around noon, we reached Layang Layang, the 4 km out pitstop where we had our lunch. Our tour guide gave us each a packed lunch, which was just a simple sandwich.
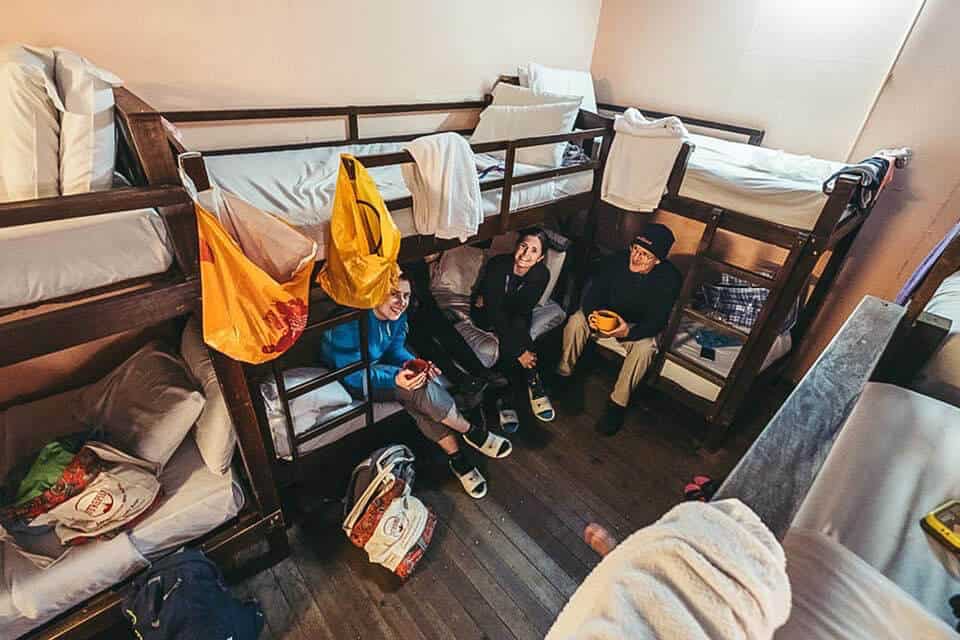
After a few more hours of hiking, we eventually reached the Panalaban base camp at 3 PM, where we will be staying for the night. At 3,272 meters above sea level, there are several accommodations in the area, but none are as famous as the Laban Rata Resthouse.
In fact, it is so well-known that most people just call the whole base camp Laban Rata.

Assignment to the huts was random (unless you specifically requested a certain room or are a via ferrata climber), and luckily we were assigned to the Laban Rata Resthouse. But because we didn’t specify what we wanted, we were obviously put in the 12-bed unheated dormitory room.
(NOTE: Via Ferrata climbers always stay in Pendant Hut.)
The Laban Rata Resthouse features mostly unheated dormitory rooms, but it also contains 3 private heated rooms with heated showers.
A buffet-style dinner was served from around 5 PM to 7 PM at the main hut in Panalaban, which was the Laban Rata Resthouse. Get here early because food could run out!
After dinner, we mingled with the other hikers before all going to bed, completely ignoring the colder shower (ice cold) that was available to dormitory guests.
After a tiresome day of hiking Mount Kinabalu, falling asleep was no difficult task. We rested as much as we could because the hike started at 2 AM the next day!
Day 2: From Panalaban Base Camp (3,270 m) to Low’s Peak (4,095 m)
Now it’s time to reach the summit (if the park rangers allow it). Strap on your headlamp and follow your guide up the path to the summit. The path to the summit is only 2.7 km long but it will take you around 3 hours to complete due to the altitude and treacherous terrain.
When you leave the comfort of Laban Rata Resthouse, you’ll find around 300 hikers all leaving at the same time, so the first part of the summit hike can be a bit congested…but at least you don’t have to stop in the mud!
After about an hour, you might start to feel the altitude kick in. The good thing about this part of the hike, is that the incline is not quite as steep, but that does not make it any easier.
When I did this hike, I hiked with a professional athlete and a retired couple, and when you reach around 3000 meters, we were all at the same fitness level due to the altitude. Make sure you come prepared with some altitude sickness pills, or at least some medications for any potential headaches.
At around 3:30 AM, we reached Sayat Sayat, the entrance to the summit. The entrance to the summit closes at 6 AM because of strong winds, so you’ll want to make sure you walk fast to reach the gate in time. If you don’t make it in time, you won’t be able to summit!
In front of us were millions of years old bare granite, created by geological processes that gave birth to Mount Kinabalu. The geology near the peak of Mount Kinabalu is truly surreal. Without any vegetation, it felt like we were on the surface of a barren planet.

Starting here you need to pay close attention to your guide as there are what they call ‘danger zones.’ These zones are prone to falling rocks, so when hiking through them, you cannot stop.
There are ropes to help you climb up the steep bits and usually the danger zones are only around 200 meters long, so don’t worry too much about them. Just make sure to stick close together with your guide and group.
We reached the summit at around 4:30 AM, just before the sunrise. The last 700 meters were the hardest 700 meters of our lives, but from a distance you can see the very tip of Low’s Peak, the summit of Mount Kinabalu.

Just seeing the tip shining bright in the distance with the sun rising behind it, gave me the energy I needed to race to the summit.
Once at the summit, you can sit on the rocks of Low’s Peak and witness the sun illuminating 360 degrees around you. As the sun shines over the vast landscape of the Kinabalu park, all will become worth it.

But once it hits 6 AM, don’t hang around, as the wind can become quite strong during the day.
Getting down is much easier and quicker, but don’t rush it, as the inclines are still very steep, and this is where accidents can happen. Now that the sun has come up, you can see just how far and how high you have come.
It takes about 1.5 hours to get back to Panalaban from Low’s Peak, so make sure you have enough time to grab breakfast at Laban Rata Resthouse before heading back down to Timpohon Gate. Breakfast ends at 10:30 AM.
At about 9:30 AM, we finished breakfast and began to head down the trail. Going down felt like flying, as our legs were exhausted from the hike up and our heads were in a state of awe from the experience.

It is a good idea to have hiking poles for this bit, as it is still an 8.7-km hike and the rocky terrain can add pressure to your hips and knees.
We got to the end of the hike (Timpohon Gate) at around 3 PM and we were exhausted but exhilarated. We picked up our bags and climbed into a bus which took us directly to the Poring Hot Springs (included in our tour package) where we sat for hours in the hot water, soothing our aching limbs.
Climbing Mountain Kinabalu Packing List & Tips
One of the best climbing Mount Kinabalu tips is to pack light. It is easy to make the mistake of packing as many things as you need and a little more. However, this will tire you out much quicker.
Here is our recommended Mount Kinabalu packing list with just the essential items to bring!
- Comfortable & Waterproof Backpack – Your backpack for this hike is probably the most important item. Too big and you will carry unnecessary weight. Too little and you won’t be able to carry everything. We found that 30L is the perfect Mount Kinabalu backpack size. Just make sure it is waterproof or bring a rain cover!
- Headlamp – Typically a handheld flashlight will suffice on any hike, but you will need both your hands to hold onto big rock and ropes when you ascend to the summit.
- Altitude Sickness Tablets – Speak to your doctor before traveling about getting some altitude sickness tablets. Altitude sickness is a real thing and can be serious if not properly treated.
- Warm clothing (Wool Socks/Gloves/Hat) – Though most of the hike you won’t feel cold, you will need clothing for your unheated rooms in Panalaban and the summit of Mount Kinabalu. At the summit, it can be as cold as 4 degrees Celsius (or 39 degrees Fahrenheit)!
- A Good Pair of Hiking Boots (Him/Her) – Not only is the hike steep, slippery, and wet, but it is also very long. It took us almost 10 hours to get from the bottom to the top and back down again. The best hiking shoes for Mount Kinabalu are ones with ankle support. We wore Salomon hiking boots and they were ideal for this hike.
- Lots of snacks – It is inevitable that you will get hungry on the Mount Kinabalu trek. Though you will be given lunch and dinner, you will still need some snacks to keep you at your peak performance. We highly recommend the Kendall Mint Cake if you can get your hands on some.
- Hiking Poles – Though we aren’t big fans of hiking poles, it is an item you must bring to the Mount Kinabalu climb. Hiking poles will assist you both on the way up and down the treacherous Mount Kinabalu hiking trail. A good set of hiking poles will make sure you’re still able to walk the next day.
- Sun Cream – Most of the hike is covered by vegetation and you’ll summit the mountain at night, but on the way down you may find the sun is a little stronger. If you are doing the via ferrata, sun cream is a must or your will burn! Sun cream is a luxury in Southeast Asia. Bring a bottle from home to save money and ensure you have good sun cream!
- Insect Repellent (With Picaridin) – The first section of the hike is through dense jungle near a stream, which is a breeding ground for mosquitoes. Make sure you pack some insect repellent to protect you for this bit, because hiking with itching bites is definitely no fun!
When looking for insect repellent, make sure you find some with Picaridin and not DEET. Picaridin is a “newer” active ingredient in insect repellent and is shown to be more effective and better for the skin than DEET! - A Portable & Good Camera – If you don’t have photos to show, have you actually hiked Mount Kinabalu? You’ll want a portable camera capable of taking amazing photos on this hike. We highly recommend the affordable and portable Sony a6300 mirrorless camera.
- Passport – You should also remember to bring your passport, which you will need to get your climbing permit.
- Waterproof Jacket (Him/Her) – The weather can be unpredictable in Kinabalu park, especially at high altitudes. You don’t want to be caught out if it rains!
- Change of Clothes – Once you reach the rest stop at Panalaban base camp, you can take a freezing cold shower and change into some clean clothes that are more comfortable to sleep in.
- Toiletries – When you get to the rest stop, you can take a shower, but soap is not provided. Make sure you pack the basic essentials such as shower gel, a toothbrush, toothpaste, and a towel!
- Wet Wipes – If you are like the majority of the human population and hate taking a freezing cold shower, we recommend you bring some wet wipes. Though they aren’t the most effective, they should do the job if you are only staying for a night.
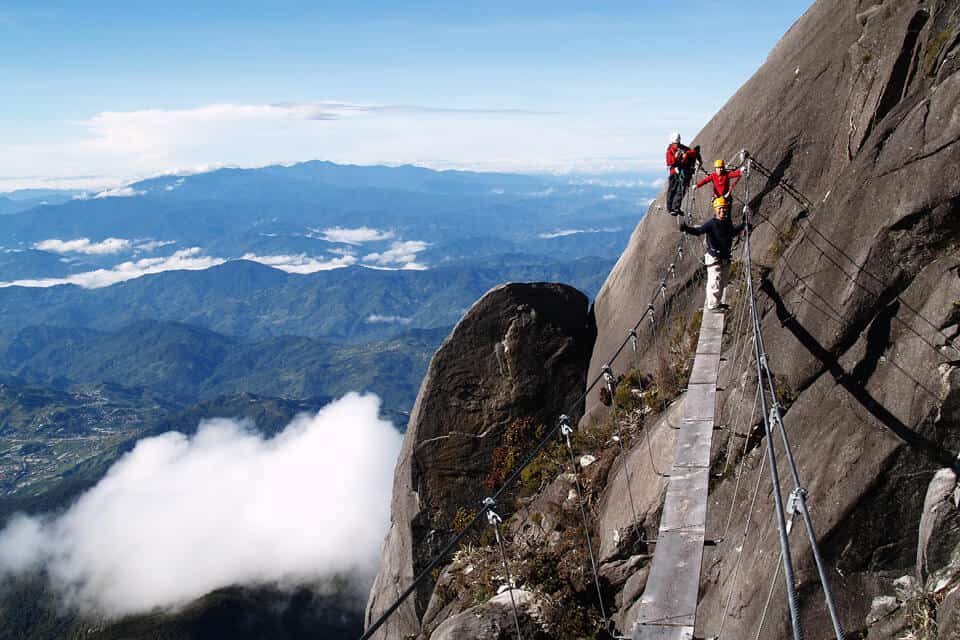
Mount Kinabalu Via Ferrata
Adrenaline junkies who would like to add more spice to their Mt. Kinabalu hike can participate in the Via Ferrata, a protected climbing route consisting of a series of rungs, cables, rails, and ladders all fixed onto the rock surface.
The world’s highest via Ferrata is Mountain Torq and can be found on Mount Kinabalu. The via Ferrata starts at an elevation of 3,200 meters and ends at 3,776 meters above sea level. Though it might sound dangerous, no experience is required to enjoy this simple mountaineering activity.
There are two via Ferrata routes on Mount Kinabalu: Low’s Peak Circuit and Walk the Torq.
Anyone intending to partake in any of the via Ferrata must take an introductory briefing from 3 PM to 4 PM in Pendant Hut at the Panalaban base camp. Without doing so, you will not be able to participate in the via Ferrata, which occurs the following day.
This means you must be physically capable of hiking to the base camp before 3 PM. We arrived just at 3 PM though we had a late start and there was a lot of congestion on the way up.
Not only will you need to arrive earlier on the first day, but you will also need to get down from the summit earlier too. You must arrive at the designated place at a certain time to partake in the via Ferrata. If you miss it, you lose your chance and your money!
Walk The Torq Via Ferrata Mount Kinabalu
Walk the Torq is the ideal choice for anyone looking for a beginner via Ferrata experience. As an introductory via Ferrata route, Walk the Torq is much easier in terms of duration and distance traversed (vertical and horizontal).
The Walk the Torq via Ferrata features a 109-meter vertical traverse with a total length of 430 meters. The highest elevation you will reach on Walk the Torq is 3,520 meters above sea level. Participators usually take about 1.5 hours to complete the route.
Hikers deciding to do Walk the Torq via Ferrata must arrive at the Sayat Sayat hut (near the entrance of the Mount Kinabalu summit) at 7:15 AM the latest. Though it isn’t difficult to reach Sayat Sayat, it eats into valuable sunrise admiration time.
Though we haven’t done Walk the Torq (in fact, any of the via Ferratas on Mount Kinabalu), we heard it is a great way to get to know a different way of exploring the stunning landscapes on the mountain!
Low’s Peak Circuit Via Ferrata Mount Kinabalu
Measuring 1.2-kilometer long with a 365-meter vertical traverse, the Low’s Peak Circuit is the more difficult via Ferrata option. Even though it is considered more challenging, no experience is needed to go on Low’s Peak Circuit. The highest point on the Low’s Peak Circuit is 3,776 meters above sea level.
The whole circuit usually takes about 5 hours to complete. Anyone willing to attempt this via Ferrata must keep in mind the already difficult Mount Kinabalu hike that they are doing!
On the second day of the climb, hikers must reach the 7.5-kilometer checkpoint before 6:30 AM to participate in the Low’s Peak Circuit.
On the Low’s Peak Circuit, mountaineers will get to walk along the cliff and go on the monkey bridge, which are both incredible moments on Mount Kinabalu.
Hiking Mount Kinabalu FAQs
How Long Does It Take to Climb Mount Kinabalu?
It takes a total of two days and 1 night to hike Mount Kinabalu. On the first day, hikers have to hike for about 5 to 7 hours. On the second day, hikers ascend to the peak of Mount Kinabalu in 3.5 hours, and then takes about 8 to 9 hours to reach back to the bottom.
What is Mount Kinabalu’s height?
Mount Kinabalu is 4,095 meters above sea level.
What is the Best Month to Climb Mount Kinabalu?
The best month to hike Mount Kinabalu is generally March to September as that is the dry season. Though you have to consider that this is the peak season for Mt. Kinabalu so securing your tour ahead of time is crucial.
Like this post? Don’t forget to save it on Pinterest!

This concludes our guide on climbing Mount Kinabalu in Sabah, Malaysia. We hope you will find our hiking tips and information helpful for your Kinabalu adventure!
Any questions? Leave a comment!
Disclaimer: Some of the links above are affiliate links. That means if you book or make a purchase through the links, we will earn a small commission at no extra cost to you! The money will help run this site! Thank you!